
So you’ve made it through the port scanning challenge, congrats! (If you haven’t, go read up on nmap over on WebWitch‘s blog which you can find here.) Now you’ve hit a challenge called “Hidden Treasure” and you have no idea what that means. Don’t worry, I started out in the same boat and didn’t learn how to do this type of challenge until my third season of National Cyber League (NCL). If you’re learning this in your first season, you’re already in a much better spot than I was in my third (and I was already coaching our team).
What is DirBuster?
DirBuster is a penetration testing tool with a Graphic User Interface (GUI) that is used to brute force directories and file names on web and application servers. You can also use DIRB for this challenge if you enjoy command line and want to figure that out, but I prefer GUI applications so that’s how I’ll demonstrating this type of challenge.
Keep in mind that both of these tools are preloaded into Kali Linux, so as long as you have your Kali VM set up, you should be good to go! If not, there are a couple of blogs posted which you can find here and here, so pick the one that is easier for you to follow along with and get yourself set up.
WARNING: Using DirBuster or DIRB on a website or application you do not have permission to use is ILLEGAL. Unless you are in a controlled environment and given a specific url such as in the NCL Games or a different CTF or have a penetration testing contract with a company, DO NOT USE THIS ON ANY WEBSITE OR APPLICATION YOU WANT.
You will most likely get in a boat load of trouble.
First things first, navigate to your full application list and click on the “03-WebApps” folder. This is where you’ll find DirBuster.
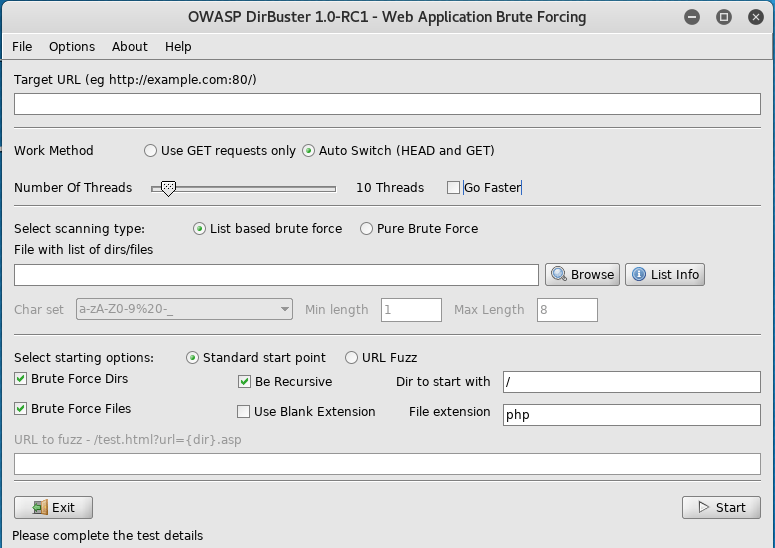
Let’s walk through each of the sections step by step:
Target URL: This will be the URL that Cyber Skyline provides for the challenge. It will be in the format of: https://some-word.cityinthe.cloud. You will also need to include the port number after the URL, which will be 80 if the site is using HTTP or 443 if it’s using HTTPS.
If this case we would type out: https://some-word.cityinthe.cloud:443
Work Method: You can leave this on the “Auto Switch (HEAD and GET)” setting.
Number of Threads: You should always check off the “Go Faster” box. This will change it to 200 threads instead of 10 threads and make this challenge go a little bit faster for you (fair warning, this is a bit of a slow one, as are most scanning challenges). If you think your CPU can handle it, feel free to set it to more than 200 threads. If you’re not sure or you’re using a not great laptop, I’d recommend leaving it at 200.
Select scanning type: You can leave this on the “List based brute force” setting for our purposes.
File with list of dirs/files: Since we’re using list based brute force, you’ll need to chose a word list. Luckily, the word lists for DirBuster as also preloaded into Kali, you just need to pick one. If you click on “List Info”, you see this list:

You’ll notice at the bottom of the list that there are two lists, directory-list-2.3-big.txt and directory-list-lowercase-2.3-big.txt that are labeled as old lists that can be downloaded from http://sourceforge.net/projects/dirbuster. I recommend downloading these onto your VM because, if you’re anything like me, you’re a little bit lazy and those two word lists are much larger than all the other ones and you really don’t want to have to run this twice because you couldn’t find all the flags.
If you decide not to download the larger word lists and chose to use one of the preloaded ones, I recommend using directory-list-2.3-medium.txt since it is the largest list. You will need to put the full path for whichever list you choose, so if it is the preloaded one the path would be /usr/share/dirbuster/wordlists/directory-list-2.3-medium.txt. If you decide to download the larger lists, than you can click on the “Browse” button and look through your files until you find and and the entire path will input automatically when you choose the file.
Select starting options: For our uses, keep “Standard start point,” “Brute Force Dirs,” and “Be Recursive” selected, as will as starting with “/” as the “Dir to start with.” For our purposes, we won’t really need to “Brute Force Files” so you can deselect that box. Feel free to play around with these settings and find what you like best.
Now that we have all of our settings sorted out, go ahead and click the start button in the bottom right corner.
Once the scan gets going, you’ll start to get a list like this:
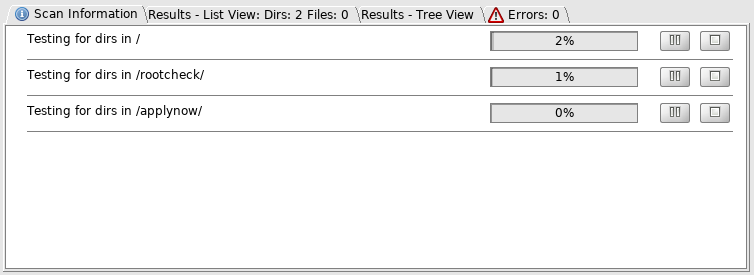
Once you have the names of the directories, you can click on the stop button to shorten the time this scan takes. For a normal penetration test you would let them keep running, but we really don’t need to get a full picture of the directory architecture here, which you would look at in the “Results – Tree View” tab if you were doing a full penetration test. You really won’t find much there anyway in this case, since we aren’t looking for files.
Now that we have a few directory names, you can go into your browser and start adding them to the end of the URL. In this case we can type: https://some-word.cityinthe.cloud/rootcheck/
When you find a page with a flag you’ll need, it’ll look like this :
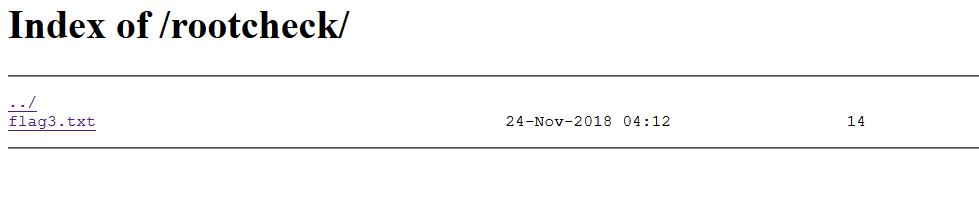
You can then click on flag#.txt, and you’ll be taken to a page with the flag on it, which will be in the format NCL-SCAN-1234.
Congratulations! You now know how to brute force websites to find hidden directories. Remember to use this skill wisely, and don’t do anything illegal!
If you have any questions, feel free to reach out to me on Twitter @Jeana_Byte. Happy hacking!
